
My Iwagumi Aquascape Journey Part 2: Grow Out
- Brian Blake

- Jul 21, 2022
- 7 min read

In Part 1, I detailed the beginning of my journey from an idea to a flooded and cycling Iwagumi style aquarium. In part 2, I will cover what I've done since flooding the aquarium. I performed numerous water changes, countless parameter tests, light and flow adjustments, and trimmings.
My goals were to have a beautiful aquarium and learn all I could about this aquascaping style. There were only a few things I would have done sooner If I could do it again, but so far, nothing I regret.
The final leg of the journey will be adding livestock, which I'll discuss in part 3. For now though, let me show you what I've managed so far.
Water Changes
After the flooding, I waited 24 hours and did a water analysis for ammonia (NH3), ammonium (NH4+), nitrite (NO2-), nitrate (NO3-), pH, carbonate hardness (KH), and general hardness (GH).
5/6/22 - 4:00 pm - No Water Change
pH | 6.2 |
KH | 0 dKH |
GH | 3 dGH |
NH3/NH4+ | 8+ ppm |
NO2- | 0.25 ppm |
NO3- | 5 ppm |
CO2 | 9.3 ppm |
I expected the free and total ammonia to be high because nitrogen leaches from the soil readily at first. However, I did not expect it to max out my test kit at over 8 ppm. I added 1.5 grams of alkalinity (KH) buffer directly to the tank and did not perform a water change.
5/7/22 - 5:00 pm - 1st Water Change
pH | 6.0 |
KH | 2 dKH |
GH | N/A |
NH3/NH4+ | 8+ ppm |
NO2- | 1 ppm |
NO3- | 10 ppm |
CO2 | 59 ppm |
The nitrogen cycle is in full swing, there was no sign of algae growth after 48 hours. With some alkalinity in the water, CO2 shot up to 59 ppm at 1.0 bubbles per second. I added 3 g of KH buffer and 3 g of equilibrium (GH buffer) to the 4 gallon water change I performed.
5/8/22 - 4:00 pm - No Water Change
pH | 6.2 |
KH | 2 dKH |
GH | 3 DGH |
NH3/NH4+ | 8+ ppm |
NO2- | 1 ppm |
NO3- | 10 ppm |
CO2 | 37 ppm |
On day three, I did not perform a water change. I added 1.5 g of KH buffer directly to the tank (after dissolving in a ½ cup of tank water). I increased CO2 to 1.25 bubbles per second.
I measured bubbles per second, by starting a stopwatch and counting bubbles for what felt like about ten seconds. I then stopped the timer and divided the bubbles I counted by the seconds displayed on the watch. I say what “felt” like ten seconds because you don’t want to look away from the bubbles you're counting to check the stopwatch.
If you count 18 bubbles and the stopwatch reads 13 seconds, that's 1.38 bubbles per second. The longer you count, the more accurate your calculation will be.
5/10/22 - 5:45 pm - 2nd Water Change
pH | 6.0 |
KH | 2.5 dKH |
GH | 3 dGH |
NH3/NH4+ | 8+ ppm |
NO2- | 5 ppm |
NO3- | 30 ppm |
CO2 | 73 ppm |
The nitrogen cycle is beginning to peak with nitrites at 5 ppm. I added 2 g of KH buffer and 3.2 g of GH buffer to the 4 gallon water change.
5/13/22 - 5:00 pm - 3rd Water Change
pH | 6.2 |
KH | 2.0 dKH |
GH | 3.0 dGH |
NH3/NH4+ | 8+ ppm |
NO2- | 5 ppm |
NO3- | 5 ppm |
CO2 | 37 ppm |
On day 8 and water change three, I add 3 g of KH buffer and 3.2 g of GH buffer to a 4 gallon water change. No algae and the hair grass is growing rapidly.
5/15/22 - 4:00 pm - 4th Water Change
pH | 6.2 |
KH | 3.0 dKH |
GH | 5.0 dGH |
NH3/NH4+ | 8+ ppm |
NO2- | 5 ppm |
NO3- | 5 ppm |
CO2 | 56 ppm |
Another water change with 1.2 g of KH buffer and 3.2 grams of GH buffer added to the 4 gallon water change.
5/17/22 - 1:30 pm - 5th Water Change
pH | 6.2 |
KH | 2 dKH |
GH | 5 dGH |
NH3/NH4+ | .25 ppm |
NO2- | 5 ppm |
NO3- | 5 ppm |
CO2 | 37 ppm |
Finally, the ammonia drops to .25 ppm. I completed a 5th water change with 1.5 g of KH buffer and 3 g of GH buffer added to a 4 gallon water change. I also added a half dose (0.5ml) of Flourish, an all in one plant fertilizer.
5/19/22 - 6:20 pm - No Water Change
pH | 6.2 |
KH | 2.0 dKH |
GH | 6 dKH |
NH3/NH4+ | 0.1 ppm |
NO2- | 0 ppm |
NO3- | 50 ppm |
CO2 | 37 ppm |
The nitrogen cycle is almost complete. I added another half dose (0.5 ml) of Flourish and 1.5 g of KH buffer directly to the tank. There is calcium and magnesium in the fertilizer. If the plants are not absorbing it fast enough, this may explain why the GH is increasing.
5/22/22 - 4:30 pm - No Water Change
pH | 6.2 |
KH | 3 dKH |
GH | 6 dGH |
NH3/NH4+ | N/A |
NO2- | N/A |
NO3- | 80 ppm |
CO2 | 56 ppm |
The nitrogen cycle is complete and nitrate continues to rise.
5/27/22 - 3:00 pm - 6th Water Change
pH | 6.4 |
KH | 2.5 dKH |
GH | 6 dGH |
NH3/NH4+ | N/A |
NO2- | N/A |
NO3- | 80 ppm |
CO2 | 73 ppm |
PO4+ | 0.00 ppm |
Phosphates tested at 0 ppm. Performed a 4 gallon water change with 1.2 g of KH buffer and 4.2 g of GH buffer added.
6/12/22 - 2:00 pm - 7th Water Change
pH | 6.4 |
KH | 3.5 dKH |
GH | 6 dGH |
NH3/NH4+ | N/A |
NO2- | N/A |
NO3- | N/A |
CO2 | 41 ppm |
Waiting two weeks between water changes to allow plants to soak up as many nitrates as they could. I continued to dose 0.5 ml of Flourish twice weekly. Performed a 4 gallon water change with 1.2 g of KH and 3 g of GH buffer.
5/8/22 - 4:00 pm - No Water Change
pH | 6.4 |
Kh | 3.0 dKH |
GH | 8 dGH |
NH3/NH4+ | N/A |
NO2- | N/A |
NO3- | 80 ppm |
CO2 | 35 ppm |
Continuing to dose fertilizer without a water change increased GH to 8 dGH, higher than I would like. Performed a 4 gallon water change with 1.2 g of KH and 2 g of GH buffer added.
5/8/22 - 4:00 pm - No Water Change
pH | 6.4 |
KH | 4 dKH |
GH | 6 dGH |
NH3/NH4+ | N/A |
NO2- | N/A |
NO3- | N/A |
CO2 | 47 ppm |
4 gallon water change with 1 g of KH and 2 g of GH buffer added.
5/8/22 - 4:00 pm - No Water Change
pH | 6.4 |
KH | 6 dKH |
GH | 10 dGH |
NH3/NH4+ | N/A |
NO2- | N/A |
NO3- | N/A |
CO2 | 118 ppm |
After a month of no water change and just adding Flourish twice weekly, the general hardness climbed significantly. I suspect this is the case because the calcium and magnesium is not being utilized by the plants quickly enough and is building up.
I will counteract this with weekly water changes to “reset” the unutilized fertilizer elements. In addition, I will switch to a regimen of adding each fertilizer (nitrogen, phosphorus, potassium, iron, and trace elements) separately. This way, calcium and magnesium levels will be controlled with GH buffer and will not be added by any other source.

Light Adjustment
I’ve adjusted the lighting on this setup three times so far. With a programmable dimmer installed on a Twinstar light, I’m able to ramp up and down the intensity and timing easily.
First Setting 5/6/22
Setting Number | Time (24hr) | Intensity |
1 | 11 | 1 |
2 | 12 | 20 |
3 | 14 | 50 |
4 | 16 | 50 |
5 | 18 | 20 |
6 | 20 | 10 |
7 | 21 | 5 |
8 | 22 | 0 |
This first setting was intended for low intensity as the tank was cycling. It was just enough for plant growth, but was intended to keep algae from taking over.
Second Setting 6/23/22
Setting Number | Time (24hr) | Intensity |
1 | 11 | 1 |
2 | 12 | 20 |
3 | 14 | 50 |
4 | 26 | 60 |
5 | 18 | 60 |
6 | 20 | 20 |
7 | 21 | 10 |
8 | 22 | 0 |
After the initial tank cycle was winding down and I had started the first fertilizer regimen, I increased the lighting to a higher intensity.
Soon after, I began to get a little hair algae growth. After it subsided, I increased the lighting intensity once more to the third and current setting.
Third Setting 7/10/22
Setting Number | Intensity | |
1 | 11 | 1 |
2 | 12 | 20 |
3 | 14 | 50 |
4 | 16 | 70 |
5 | 18 | 80 |
6 | 20 | 40 |
7 | 21 | 10 |
8 | 22 | 0 |
Fertilizer
I began adding fertilizer on 5/17/22. I used an all-in-one formula which included nitrogen, phosphorus, potassium, iron, calcium, magnesium, and several trace elements.
After the water change on 6/12/22, I noticed the general hardness was increasing between water changes. I suspect this is because the fertilizer contains calcium and magnesium and was not being used by the plants quickly enough to prevent it from building up.
To remedy this, I decided to switch to a fertilizer regimen on 7/19/22 that includes all the same elements as before, minus calcium and magnesium, plus a few other trace elements, all added individually. This would give me better control over limiting factors and what was being used up faster during extended periods of no water changes.
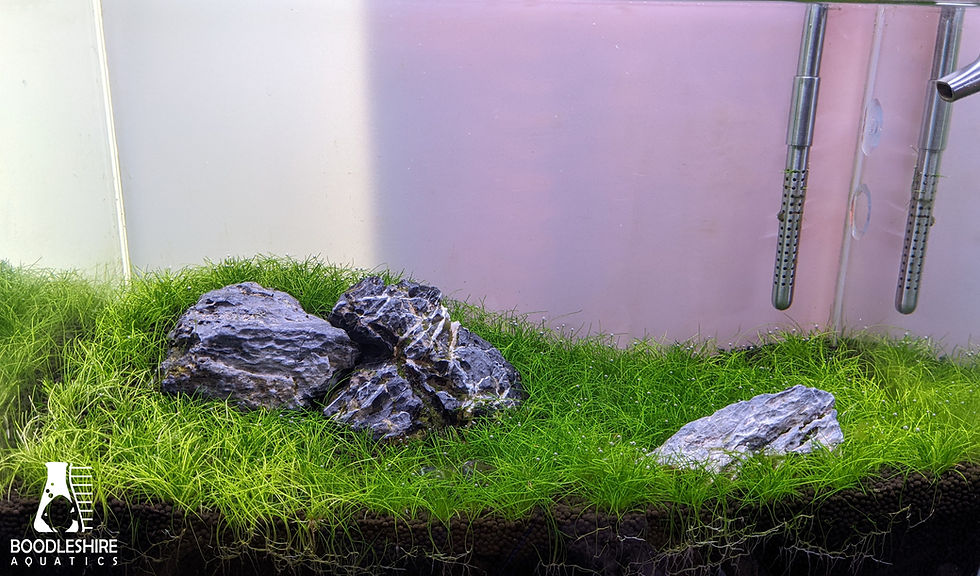
Trimming

Over the course of the two and half months the tank has been flooded, I have trimmed three times. The dwarf hair grass has grown significantly and consistently in the center portion. The corners of the tank are experiencing some yellowing and slower growth.
The first two trims were intended to remove the tallest growth and remove much of the hair algae that had accumulated. I wanted to keep the tallest growth trimmed down while allowing the carpet to fill in as much as possible.
The third trim was intended to cut the grass to a uniform carpet. It was at this stage I began to see what will become the final “look” or scape of the tank.
With Iwagumi setups, it is recommended to let the plants grow for several weeks after flooding. After this period of unfettered growth, you should then start trimming and shaping the plants to their intended final look.
I used a pair of 25 cm double curved shears, and a pair of 25 cm 90 degree foreground shears. Due to the size of the tank, the 25 cm shears are too long to reach the center of the tank at a low angle as they bump against the side of the tank. On the next trim, I will also be using a pair of 15 cm curved spring shears to reach the center portions.
Flow Adjustment
About four weeks after flooding, I noticed the corner of the tank that received the most flow from the filter output was growing the slowest and was not as green or full as the center of the tank. To diagnose this issue, I installed a ball valve on the filter output and adjusted the flow by half.
Little to no change occurred in the following two weeks so I increased the light intensity on 6/23/22. After 27 days, little to no change occurred. Next, I tried changing the fertilizers.
I originally changed the fertilizer regimen to prevent general hardness creep, but it should also prevent any elemental limiting factors to plant growth and could be the cause for the yellowing corners.
If the corner continues to diminish in growth, I will raise the light further from the tank to increase spread, and then increase the lighting intensity again. Because the center of the tank has full color and growth, but the corners do not, I suspect the spread of the light may be at fault.
Remember, the key to diagnosing a problem is to change one variable at a time and wait to see a response. If you change two variables simultaneously, you may arrive at your solution faster, but you won’t know which one fixed it and you’ll be back to square one the next time it happens.
What’s Next
In the coming months, I will continue to diagnose the yellowing corners, trim the hair grass every few weeks, perform water changes on a weekly basis, add fertilizers twice weekly, and monitor pH, KH, and GH. When I’m confident those three parameters are stabilized, I will add freshwater shrimp and celestial pearl danios.
Stay tuned for part three.


Comments