
My Iwagumi Aquascape Journey Part 1: Hardscape, Dry Start, and Flooding.
- Brian Blake
- May 9, 2022
- 8 min read

My destination is a pristine, healthy, beautiful Iwagumi aquascape. I have not arrived there yet, but the first leg of my journey is complete. I wanted to write this article to journal what I've done so far in my quest to try something new in the aquarium hobby.
One of the aspects of the aquarium hobby I love the most is trying new things and overcoming new challenges. I have always enjoyed naturescapes more than other aquascaping styles. There are many different types of naturescapes. One of the more challenging styles is the Iwagumi setup.

In the fall of 2021 I had the opportunity to pick up a used Aqua Design Amano (ADA) 10 gallon (45p) tank with all the accessories including a Twinstar planted light, canister filter, and inline diffuser. The setup even came with the plants the previous owner had been growing. I transferred them to my 38 gallon high-tech planted aquarium and they have been doing very well.
I wanted to start from scratch. I wanted to build my very own Iwagumi setup from the ground up. Part of the Iwagumi (and most Japanese aquascaping) styles is achieving a sense of balance and harmony. The only way to truly achieve a personal sense of balance and harmony in your tank is to do it yourself.
The journey to flooding took me nearly eight months. I had a lot of patience as I chose a spot for the aquarium, built the soil layers, arranged, changed, rearranged and changed again the hardscape (rocks), then dry started the plants, and finally flooded the aquarium.
Choosing the Aquarium’s Location

Deciding where your aquarium will go is an important decision. I had two options to choose from. I ultimately chose to put my new setup opposite my other tank, in the same corner, for a couple reasons. The first being both tanks will run off the

same CO2 cylinder using a dual stage regulator. Having the 2nd tank near the first would prevent CO2 airline tubing from having to be run across the room to a distant location. The second reason was aesthetics. I have plans to use that corner of my living room as a backdrop for an ongoing project and having two tanks there only improves the backdrop.
The other location I didn’t choose will still host a tank eventually, just not the Iwagumi setup.
Living With It
The final step in deciding on the right location for my tank was to live with it for a while. I setup the empty tank, on the stand, with the light on its normal schedule for three months. You don’t have to wait that long, but I had other priorities and building this setup didn’t need to happen right away.
Even if it's just for a couple days or a week, living your life with the tank in its proposed spot allows you to see if anything is wrong with the placement, including how it looks, the amount of traffic around it, sunlight coming in from windows, or drafts from windows or air vents.
Building the Soil Layers
When building the soil layers for my Iwagumi setup I wanted to achieve two things. First, I wanted to get as close as I could to recreating a natural aquatic ecosystem's soil strata. This way, my substrate would support the necessary chemicals and organisms I need to maintain plant life.
Second, I wanted to extend the life of the soil as long as I could. With many nature setups, the soil can become depleted of macro and micro elements within months or years. I wanted to lay down multiple, different strata that would allow me to remineralize the soil throughout the life of the aquarium.
Layer One

In keeping with the ADA style, the first layer of substrate was 2.5 cm of ADA Power Sand Advance, small. This layer is made up of a course, pebble sized, porous rock mixed with extra nutrients (fertilizer), dehydrated bacteria, and bamboo charcoal powder. These components are meant to help sustain and grow the substrate’s ecosystem and help plants grow for longer periods of time.

I kept a 1 inch margin between the outer panes of glass and this layer so it would not be visible from the outside of the tank when the soil layer was placed on top.
Layer Two

For the second layer of substrate I used ADA Amazonia Version 2. This soil type is made from Japanese black soil. It came with a packet of fertilizer pellets which I placed in-between the power sand and soil layer.

This type of soil is packed with nutrients, macro, micro, and trace elements. It is designed to recreate the water conditions of the Amazon River. The rich dark color contrasts well with green plants.

To create depth, I piled about 8 inches of soil in the back left corner and sloped the soil down to about 4 inches in the front left and 3 inches in the front and back right. The lowest point of the tank is just off center right.
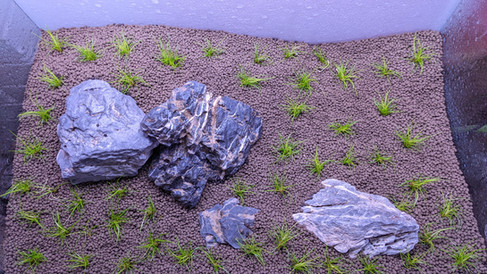
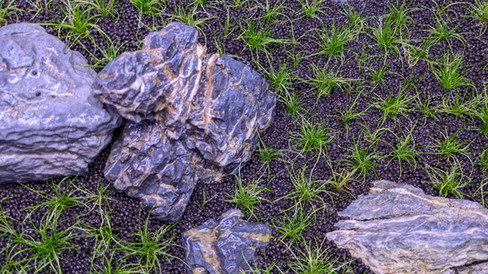
Hardscape
In a traditional Iwagumi setup, there are four types of stones. The main stone, Oyaishi, is usually the largest and draws the most attention as the focal point of the tank. The stone that directly offsets and balances the main stone is the Fukuishi stone. The third and fourth stones, Soeishi an Suteishi are meant to complement and further balance the main stone and the secondary stone.

The idea is to create balance and harmony with your hardscape, while also achieving a natural looking landscape that appears to be to scale. Ideally, when completed, the aquascape will look like rolling fields of flowing grass beset with boulders.
With the help of my wife’s keen eye for design, we arranged and rearranged nearly a dozen different hardscapes using the principles of the Iwagumi style. We used only Seiryu stone as the sentiment of the Iwagumi style is “one stone, one plant, one fish”
After each rearrangement, we “lived” with it and kept it as it was for several weeks at a time. Seemingly randomly, I would be staring at the tank, get up, and rearrange a few stones, then a few more. Eventually, we arrived at an arrangement that felt right and we had no desire to change it.
You don’t have to wait several weeks between rearrangements. But the key is to be patient. Once you add plants and flood the aquarium, rescaping is very difficult and not recommended. Disturbing the soil after the tank is flooded, causes excess nutrients to be released into the water column too early.
Dry Start
When your hardscape is complete, it is time to add carpeting plants. The best way to get carpeting plants to root in the soil and begin to grow out is through dry starting.


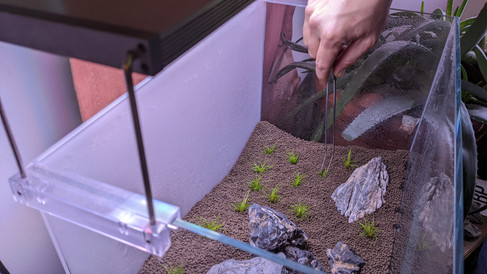


To dry start your aquascape is to wet the top of the soil with a spray bottle of RODI water. Then, after you split your carpeting plants into small clumps, evenly space them throughout the soil bed. Then cover the top of the tank with plastic wrap and turn your light up to full brightness for 6-10 hours a day.
Every day, preferably within an hour of the lights coming on, open the plastic wrap for 30 minutes and then spray the soil until the top is completely wet. Each week, spray progressively less and less water until week 6 or 8, where each day is only a couple squirts over the top of the plants. Avoid puddling in the lowest parts of the soil bed. Absorb excess water with a paper towel or small siphon. Avoiding excess pooling water keeps algae from growing.
After 4 weeks, your plants will have started to grow roots. After 6 weeks, visible new growth should start, and at 8 to 12 weeks plant clumps should be growing out by 1.5 to 2x size. You can flood anytime after week 4, but many aquarists, including myself, recommend waiting at least 6 to 8 weeks. The longer the better.
You won’t plant stem plants until the tank is flooded, because they’ll have no support in a dry tank. You can also dry start epiphytes like bucephalandra and java ferns.

In my setup, I planted tissue culture Elocharis parvulus “mini”. I began by removing the plants from their containers and washing off the nutrient agar (gel). I then separated the large bunch into several dozen small clumps and planted them equidistant from each other throughout the soil bed using a pair of fine-point forceps. I made sure to spray the plants throughout the process.

I then covered the tank with plastic wrap, ensured there were no holes, installed the light, turned it up to full brightness and began my daily routine of airing out the tank and spraying it down for 8 weeks.
Flooding the Tank
At the beginning of week 8, I was more than happy with the amount of root growth, runners, and above ground growth so I decided to flood at the end of the week. Elocharis have grass blades that grow vertically from subterranean, horizontal roots, called runners.

Before flooding, I installed all of my equipment, filled my canister filter, set up the CO2 system and inline diffuser, and put my light on the schedule I wanted. The idea being once the tank was flooded, everything would be ready to go and I could just flip the power strip on.
To flood the tank, I set up a 4ft aluminum ladder next to the aquarium with a sturdy shelf attached which could hold at least 50lbs (one full five gallon bucket). I placed an airline tube with a plant weight attached to one end in the bucket and clamped it at the top. The other end of the airline tubing was placed about 1 to 2 inches into the soil bed, trying not to disturb any plants or their roots.

The bucket was filled with 4.8 gallons of RODI water with 4 grams of Seachem Equilibrium and 1.5 grams of Seachem Alkaline Buffer. The canister filter was filled with approximately 2 gallons of the same water. A second bucket with the remaining 2.8 gallons of the same water was on standby.
I began the siphon and the water started to slowly fill the aquarium.

When flooding an aquarium with this soil type, the slower the better. Amazonia soil is full of nutrients, especially ammonia. Flooding slowly helps prevent these nutrients from releasing into the water column too much. Many nutrients will leach out no matter what, it is unavoidable regardless of the rate of flooding.

One benefit of dry starting is the Nitrosomonas and Nitrobacter bacteria have ample time to grow and begin processing nitrogen. You will still have ammonia in the water column after flooding, but at least the bacteria colonies will be present and working.
As the tank flooded, I added water from the second bucket to the one on the ladder, to keep it full and siphoning effectively.


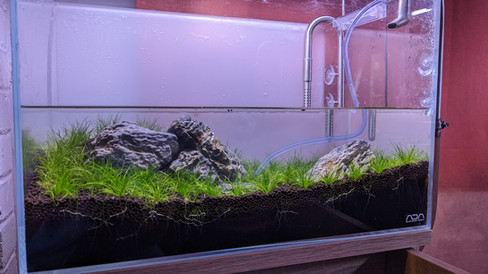


Eventually, the tank’s water level was 2.5 cm, or 1 inch from the top of the aquarium. I slowly pulled the airline tubing from the soil and disassembled the bucket and ladder setup.
There was .75 gallons of water remaining of the 9.6 gallons I started with. Therefore, the entire system, including the filter, holds 8.85 gallons of water. This number is crucial to know when dosing fertilizers, carbonates, and other additives. Remember, tank capacity (total possible volume), and system volume (actual volume of water minus substrate, plus filter volume) are two different numbers. Additives should be measured by the system volume.
What’s Next?
Now that the tank is flooded, the next two months will be spent doing several daily, then weekly water changes as the plants continue to grow out. There will be many battles fought against diatoms and early stage algaes. Finally, I’ll begin to trim the plants to achieve the final look of the aquascape. Then I'll add fish and invertebrates. The naturescape first imagined 8 months ago will have come to fruition and the rolling hills beset by boulders will become realized.
Stay tuned for part 2.